Monday, 29 November 2010

Bouncing Ball Project


Finally got my blogger set up, so that's a relief. Anyway, this post is about my earlier work on producing a 2-D animated bouncing ball test shot.


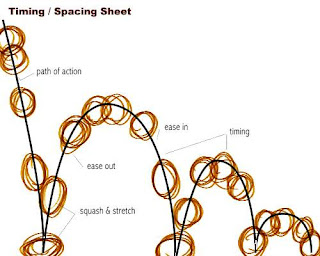
Here are some technical sketches I have drawn based on some live-action footage I produced for experimentation. The type of ball I decided to use was a tennis ball (mainly because my pet dog has a whole box of them). So I had to do tests with an actual tennis ball to observe and calculate how many times the ball would bounce due to it's weight, the force used to propel the ball and the gravitational pull. Notice the path of action drawn in the sketch above based on live-action reference. The calculations made along this first sketch (above) are mainly frames at a certain point in the timeline, when the ball impacts with the floor and then reaches its maximum height and distance during each bounce.

This rough sketch is again based on the same ball bouncing in the same timeline. Once again, it's sort of broken down into frames as the ball is shown in different positions throughout and is also a rough guide for spacing, which is to say how many drawings is required for the ball to bounce from one end to the next. Notice that I have used several different colours for each ball so as not to get too confused with the process. The green colour kind of shows whereabouts the ball would either impact with the floor or reach a certain height while the red and blue colours are the transitional stages between. 

Tuesday, 23 November 2010

Bouncing Ball: Research & Live-action reference

These videos are scenes of live-action footage I shot for reference to the bouncing ball project. No audio has been processed. Each time the ball bounced across the screen, the path of action, the distance and the duration differs between attempts. I decided to use a tennis ball because my pet dog has a whole box of them. 
After I got enough footage, I uploaded the clips to my laptop and imported them into Adobe Premiere Pro CS3 where I began to break the clips down into frames for observation. I did this to get an idea of how much spacing was required to get the ball from one end to the other, the height of each bounce as the ball descends and how many frames were needed for each bounce.

Below are images that I have looked up for research.


Below is a few links of YouTube videos I had researched and chosen for more reference. The clips show good examples of animated ball shots and tutorials with the squash & stretch and spacing techniques.


These ones show reference for ball and tail animations.


Bouncing Ball Project (Continued)


These videos are two of the first test shots for the bouncing ball project using the program Toon Boom Studio v4. Based on the live-action footage and images, this is a close replica of a tennis ball bouncing across the screen, I have applied the squash and stretch technique but I made sure it decreases as it gets closer to the ground so you have to observe it really carefully. The path of action is used as a guideline for archs so the ball would bounce properly like a real ball.

Here is an experimental shot of a bouncing ball using After Effects. This was achieved using position (x,y,z), scale & rotation keyframes to move the ball from one end of the screen to the other. Notice carefully that I have applied the archs to the ball's path of action and the squash & stretch technique as the ball impacts with the ground.

BALL WITH TAIL 

After the bouncing ball stage was completed, I now had to develop a ball with tail shot, which means I had to have a ball performing actions while its tail would react to those actions as well as move of its own accord. This shot was of course achieved through use of Toon Boom Studio.


This clip here is a test shot for the ball and tail scene. The tail has not been added in this shot, as I wanted to animate the ball first then I could apply the tail as secondary animation later on.  I made the ball a kind of sentient character, through the squash and stretch technique, I attempted to make it show different emotions and expressions depending on its movement and shape, i.e.; it jumps for joy when it gets to the top, then it stretches slightly to look over the edge of the drop and it reacts by quivering in fear.  

Being critical of my work, I believe this animation to be quite fast in certain places, I’ll have to use more spacing to make it slower but I’ve made sure to use the ease in/out and squash & stretch methods excessively.

This clip is the first shot using both the ball and tail in Toon Boom Studio.  Using the eclipse and pencil tools, I created the ball first and then drew the tail in each individual frame to react to its surroundings. I decided to draw the tail in a different colour to make it stand out more. Originally the ball was supposed to accomplish its goal by going over to the other side, instead it fails and starts at the beginning again. I did this deliberately to add a twist to the story, also this clip is kind of incomplete as it stops there but I’ll get around to finishing it. 
In light of having used Toon Boom for the first time and again being critical of my own work, I believe the tail to be quite crude and is changing shape and size all the time. Then again the positions as the ball reaches certain stages are pretty good. The animation is also probably too fast, again more spacing is required. But I have added more features for comical effect, i.e. the stars that circle the ball and the twitching of the tail as the ball falls back to the bottom, indicating a struggle with its injury.


Here is the final version of the Ball with Tail scene. Like the previous test, this scene pretty shows similar characteristics, including the movement of the tail and the ball itself. As you can see, I decided to colour the ball and tail to make it more interesting, even though the background and obstacle remains pretty much the same as before. As you view the movie clip, you can see quite a lot of anticipation in this character (the ball) as it attempts to climb over the set of steps, which are slightly higher each time as the obstacle has to be more difficult for the character to overcome. And also I decided to give the story a bit of a twist as the ball fails to jump over the highest step the first time and lands back at the start again. But it shakes it off and tries a second attempt, hence the saying, "If at first you don't succeed, try try again." 

Originally, I was going to have the ball land safely at the highest step and then take some time to get down the other side ( by giving the ball a fear of heights). But due to time consuming issues, I decided to give it a quick ending by having the ball manage to get to the top, then it bounces over the edge and lands on the other side of the step, where it once again becomes exhausted by its journey. As you've noticed, I decided to make the ball suspended in mid-air for a comical cartoon effect, (I drew the tail all jagged, expressing surprise) and then it falls down again as gravity takes its toll. 

This clip is the same as before, except I decided to give the ball a more elaborate environment to interact to. I achieved this by using Photoshop, After Effects and Bryce 5.5 (a 3-D program used for  creating environments and landscapes). No audio though as I did not have time nor needed to add any.

All in all, I think I did this project quite well. Need to make a few alterations though, like I need to work on spacing and timing a bit more as the animation may seem quite fast but still, this is all practice and practice makes perfect.